
The appropriate tools can only make your professional life steady and simple. Google Apps makes it possible to achieve consistency for you or your organization. Most of you are still using a free email service from Hotmail, Yahoo, Gmail etc… which on a professional front does not portray a sophisticated image. So why not getting your own Email service hosted by Google Apps with YourDomain.com.
In this tutorial, I will explain you How to Configure Google Apps for Domain. I hope you all have webhosting and have a descent website. If not, why don’t you try some of our reviews for the webhosting.
How to configure Google Apps for your Domain:
1. Getting Started
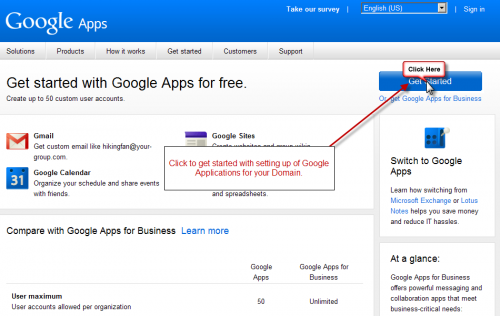
- Open Google Apps in your Web Browser using the following link http://google.com/a
- Click on Get Started button on the Google Apps website.
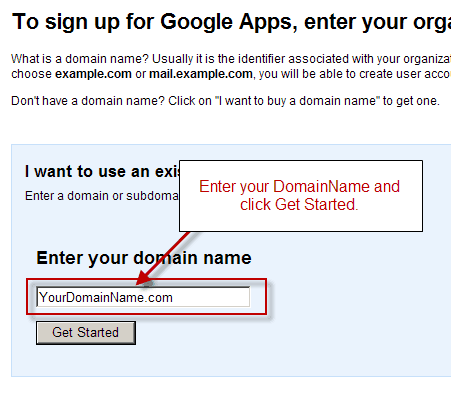
- In next window you will be prompted to enter your Domain name. Enter the domain name of your existing website like for http://www.yourdomainname.com, enter the value as yourdomainname.com and click Get Started button.
- Now further it will prompt for Valid Personal Information like Your Name, Your Organization, how many users etc… On filling the required details, click next to continue to next window.
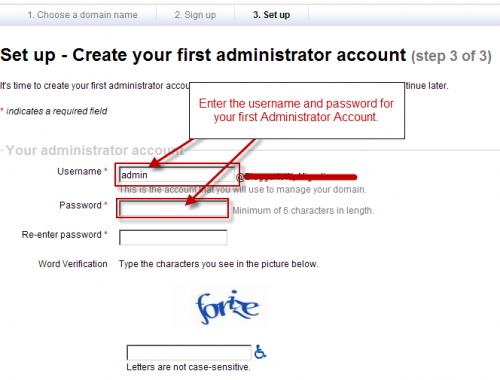
- In this window, it will create your first administrator account, which will help you in future to add/remove new users. Enter a username like “admin” and give it a password. Click
- Enter the required details and do save the login details on a Notepad file, if don’t want to stress your memory. 😉
- Now click on the Continue button to end the basic Step of the Tutorial.
2. Configure Google Apps
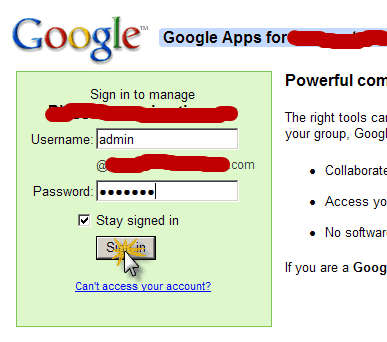
- When you finish the Basic Getting Started Step, you will be redirected to Google Apps Login form for your Domain.
- Enter the username and password which we saved on a notepad, in the initial step.
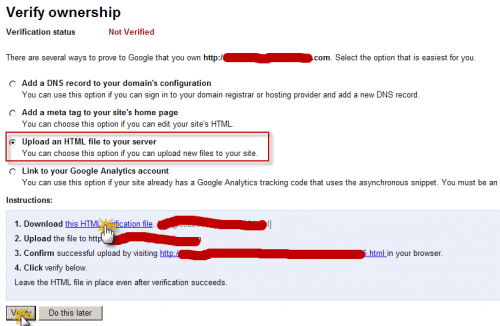
- After logging in Verify your Google Apps account by choosing an appropriate way. In the example I will be using the basic way, by uploading an html file.
- Click on the Upload an HTML file to your server. Download the HTML Verification File and upload it using a FTP in the root of your domain. Once done with uploading click on the verify button.
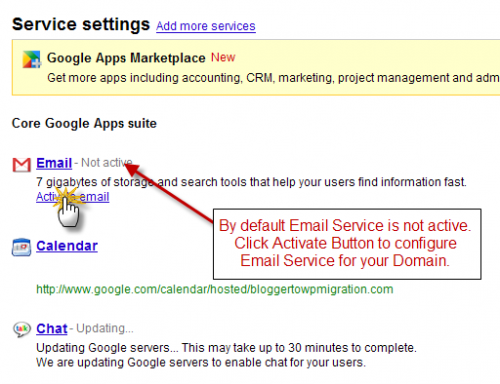
- After verifying your account, we will proceed to activate the Email Services for your domain. On the dashboard, you will find Email Service as not active. Click on the Activate Email to start Emailing services.
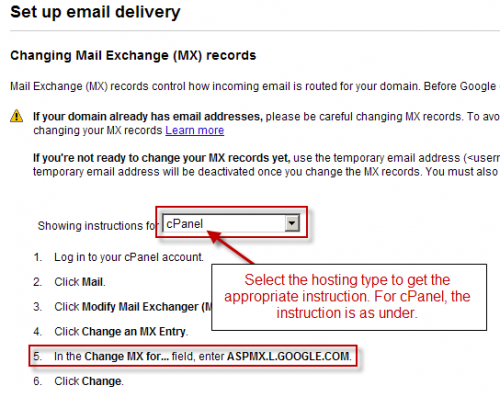
- Next you will have to setup the Email delivery, which will require your hosting details as well. For appropriate instruction select your hosting type. Like I am using cPanel as in this example.
- Sign in to your domain hosting company’s website using the username and password associated with your domain.
- Navigate to an Mail > MX Entry.
- Select your domain to add/edit MX Record. Delete any existing MX records before entering new MX records.
- Enter Priority as 0 and Destination as ASPMX.L.GOOGLE.COM
- Click edit button to save the MX Record.
- Once the MX Record has been added, click on the Verify button to activate the Email Service.
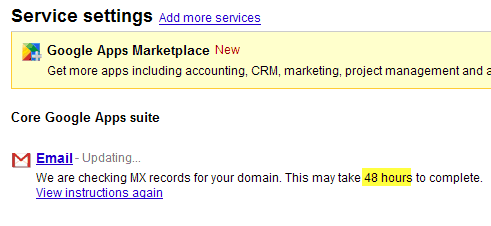
- Now you will be redirected back to the Dashboard, where you will notice that the Email Service Status is changed to Updating… which means, Google is verifying for Valid MX record with hosting which might take 48 hours to complete.
Here we come to the end of this tutorial. If you still face any issue while configuring Google apps for domain, do let us know via comments. If you find this post useful, don’t forget to share this on Facebook and twitter.
Subscribe

2 thoughts on “How to Set Up Google Apps For Domain?”
Hi,
Thank you just setup an email for my blog 😀
Got sometime to figure out that user name will admin@mydomain.. (I was trying with word admin )
Thanks
SiRu
this is too much helpful for those who want to get fast approval for their adsense application
thnx for sharing it…………