

Do you want to create a WordPress blog for yourself or a WordPress based website for your brand?
Did you know that it takes about 5 minutes to get your WordPress site up & running?
If you haven’t done so before, today I will help get your WordPress blog up & running in the next 5 minutes.
We will also be looking at SiteGround hosting (a popular name in the web hosting industry) as they keep innovating & integrating the latest technology to power their hosting program.
A Few Words about SiteGround hosting:
SiteGround is very popular because of their excellent customer support that is available around the clock. What I like the most about their support is that you will get your question answered within a few seconds.
Apart from that, SiteGround has an inbuilt caching technology called “SuperCache” which gives you the power of varnish cache on shared hosting. As far as I know, only a few selected hosting companies offer this technology for shared hosting (but no one else offers it as cheap as SiteGround).
SiteGround also offers one free domain name when you buy a hosting package from them which provides additional savings for you.

Their most popular plan is GrowBig, which offers 20Gb of space & lets you host multiple websites. With the below link, you will get an additional 45% off on your hosting purchase. To make the most out of this deal, you should grab hosting for a minimum of 24 months, as SiteGround offers this discount only on your first billing.
On SiteGround hosting, you don’t need to download WordPress & install it manually. They offer a one click auto-installer that will let you create a WordPress blog within a few minutes. Everything is automated & all you need to do is add the basic details like selecting the domain, creating your username, and rest.
Everything will be taken care of.
I assume you have already purchased a shared hosting package from SiteGround. Now, you’re all set to install your WordPress blog or website.
To get started:
- Login to your SiteGround hosting dashboard.
- Click on My Account > Go to cPanel (This will take you to your SiteGround hosting cPanel)
- Under Autoinstaller > Click on WordPress

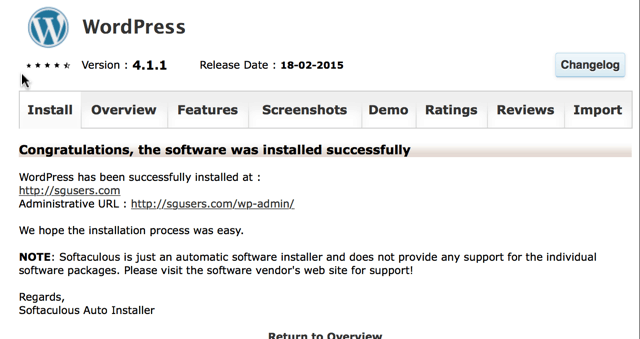
- This will take you to the WordPress Installer powered by Softaculous. SiteGround uses the Softaculous script that makes it easier to quickly install a WordPress site on SiteGround’s hosting.

- Click on “Install” (as shown in above image) and on the next page you need to select the domain where you want WordPress to be installed.
- You also need to decide if you want to use your domain with “www” or without “www”. I prefer using without “www” as this keeps the domain name short.

You can always change your “Site Name” and “Site Description” later (after installing WordPress).
SiteGround takes good care of the security of your WordPress blog and by default it uses a unique admin username. It also installs & activates a limited login WordPress plugin to secure your WordPress account.
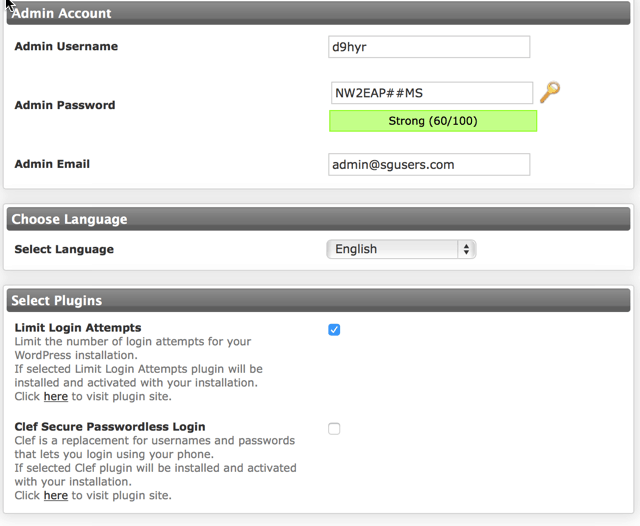
- Make sure to check the admin email address. If you have not yet created a domain specific email address, simply use your generic email.
- SiteGround also lets you install and activate “Clef Secure Passwordless Login” to add double authentications for your login area. I would skip this step for now, as we can configure this later.
- (In the above screenshots you can see my installation settings & you can use the same).
- Click on “Install” & SiteGround auto-installer will install WordPress for you.
That’s it!
Your WordPress blog is now up and running.
But you’re not done yet as you now need to login to your WordPress dashboard and make some changes. These changes are essential and will help you to make the most out of your newly installed WordPress site.
Essential WordPress Setup guide & Plugins:
Install these WordPress plugins:
Also, make the following changes:
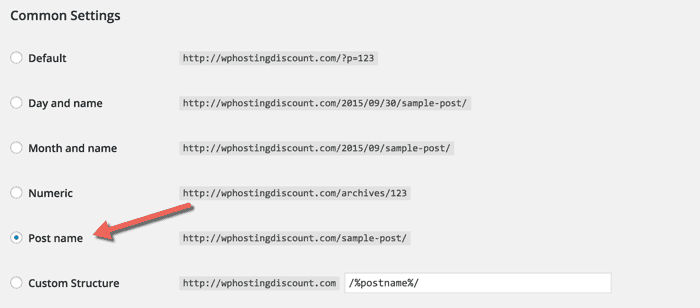
- Go to “Settings > Permalink” in your WordPress dashboard, select “Post name”, and click on “Save Changes”.
- Delete the default post and page.
- Create an “About” page & a “Contact” page
Suggested tools for your WordPress blog:
- SEMRUSH (for Keyword Research & Backlink Checker)
- Genesis Theme for your website design
With the above settings, you are all set to start your online career.
Do share this famous 5 minute WordPress installation guide with your friends & colleagues on Facebook & Twitter.
If you have any questions regarding the installation of WordPress on SiteGround hosting, let me know via the comments.
Subscribe
Contents

2 thoughts on “Famous 5 Minute WordPress Installation & Setup Guide”
Which you recommend among thsese hosting sites: Bluehost, Dreamhost and Siteground. Or, any other hosting no downtime and good speed performance. Please, reply. Thank You
@Pawan
In my personal preference:
Bluehost > Dreamhost > Siteground
I would given more rating to Siteground but they have a huge limitation. You can read about it here https://www.shoutmeloud.com/siteground-hosting-cons.html