

Have you purchased hosting from Hostgator India & looking to create a WordPress blog or Website?
This is a step by step guide to help you install WordPress blog on Hostgator India hosting. If you haven’t purchased the hosting yet, you can buy a hosting package from here & follow this tutorial to get started with your WordPress blog on Hostgator India hosting.
Hostgator.in offers custom cPanel to manage your hosting & domains and offers standard cPanel to manage your hosting account. I will show you how to get started with their custom cPanel & then go to their hosting cPanel for WordPress installation.
The steps are easy & anyone without technical knowledge can get it done. So, grab a cup of coffee & join this journey to get your first WordPress blog up & running in next 10 minutes.
How to install WordPress on Hostgator India hosting:
I assume you have already purchased hosting from Hostgator India & the first thing which you need to do is, point the domain to your hosting account. I have already covered a tutorial on the same here, and I assume you have already pointed your domain to Hostgator India hosting account.
If you haven’t done that, go ahead & do it. Now, follow all the steps mentioned below & within moment your WordPress blog will be up & running.
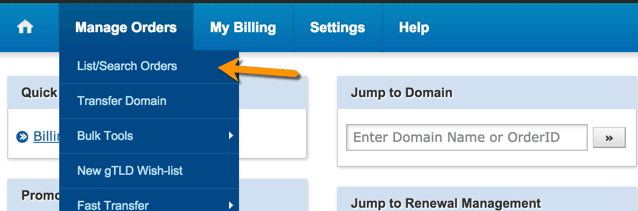
- Head over to manage.hostgator.in & login with your credentials.
- Click on manage orders > List/search orders
Click on domain name under the product hosting (See below screenshot)

On the next page, scroll down to section which says hosting India (It could be Multi-domain Linux hosting or single-domain Linux hosting) depending upon your package.

Click on manage Web-hosting (Open in a new tab) & it will open a pop-up which will take you to the cPanel hosting of your account. You can also click on Admin details there, which will give you a direct link to access your hosting cPanel & login credentials. (You can make a note of it in a Google doc file for later use).
Check this video for better clarity:
P.S: I use Evernote for taking all such notes as it’s free & work on all the devices including iPhone, Mac, Windows, Android.
Installing WordPress on Hostgator India – Fun begins here 🙂
This is how your Hostgator.in cPanel looks like:

Now, scroll down to section which says Softaculous apps installer & from here you can install WordPress blog or many other CMS like Drupal, Joomla & much more. This is the fastest & quickest way to install WordPress blog on your hosting account. (See below screenshot)

Click on WordPress & it would take you to the page where you need to configure few basics settings for your WordPress installation.

Click on Install & configure the options. (This is easy but be patient & recheck all the steps). I have already explained all the options & if you have any confusion or questions, feel free to ask in the comment section below.
- Choose Protocol: This is where you decide if you want to use www or not with your domain. Since the short domain name is good, I would suggest keep it without www. So select HTTP:// only.
- Choose Domain: Select the domain on which you want to install WordPress.
- In directory: By default Hostgator selects wp as a directory, & I suggest you to remove it. If you won’t your WordPress blog will be installed in a directory such as domain.com/wp, and I recommend you to install WordPress on the main domain. For example: In my case WordPress is installed on HGusers.in
- Sitename: Give a name to your site
- Site Description: In 3-4 words add a description of your site. (Note: You can always change your site name & site description later on).

Admin account section:
This is where you will configure the login details of your WordPress blog. Make sure you use any other username than admin. Also, use a complex password. If you haven’t created an admin email, you can do that later & for now add an email which you have access to. (In upcoming posts I will share how you can create an admin email). This is how my screen looks like after all the settings:

In the limit login plugin options, enable this feature. (You can, later on, disable the plugin from dashboard after you have activated Jetpack WordPress plugin).
Advanced options:
Click on Advanced options & configure the settings as shown in the below image. Ensure you have added an email address to the last option which says “Email installation details to” as this is where you will get the complete installation information. This information would be helpful at the later stage or when you need to give details to a developer for making any changes in WordPress.

Click on Install & it would take about 1 minute to finish installation of your WordPress blog.

Check your email as you will be receiving WordPress installation steps in your email. Here is the video tutorial which I promised above:
Login to your WordPress dashboard, & this is how your WordPress dashboard would look like:

Here are few quick changes you should do before you start blogging or doing anything else with your WordPress blog.
- Delete Hello world post
- Delete Sample pages from pages
- Go to Settings>permalink & select Post name as your permalink
- Install Yoast SEO plugin
- Install WP Fastest Cache plugin
- Install & configure Akismet plugin (It helps to stop spam comments)
You can download this free WordPress eBook for detailed instructions on setting up WordPress blog.
I have used all above steps to create this WordPress blog on Hostgator India site. This hardly took me 10 minutes & this blog is live & you are reading it. So if you haven’t started following the steps, go ahead & within 10 minutes your WordPress blog would be up & running.
Sign up for Hostgator India account
And with this, you are all set to start blogging. If you have any question, feel free to ask me in the comment section. Do let me know how do you like this guide & do share this complete WordPress blog creation tutorial with your friends.
Subscribe
Contents
