Web hosting & a domain name give you the power to do anything. You can create a blog, create a website, or create something unique which the world has never seen.
- (If you have been using the internet for a while, and never got around to creating a website of your own, today is the right day to do that.)
I have been a user of HostGator for a long time.
Recently, I moved a few of my sites from HostGator to SiteGround to try them out. I have been hearing great things about SiteGround (especially their Supercacher technology, which turbo charges WordPress blogs on shared hosting). With regards to money & offerings, these two companies are more or less the same.
I also wanted to try a non-EIG hosting. As it is, I’m using Kinsta for my main site and another site. (I’m also testing various hosting companies so that I can share honest reviews & experiences here on this blog.) After reading lots of great reviews about SiteGround, I decided to buy and try them out.
I will cover the migration process in another post. In this guide, I’m going to be documenting the process of buying hosting from SiteGround.
Beginner’s guide to buying hosting from SiteGround:
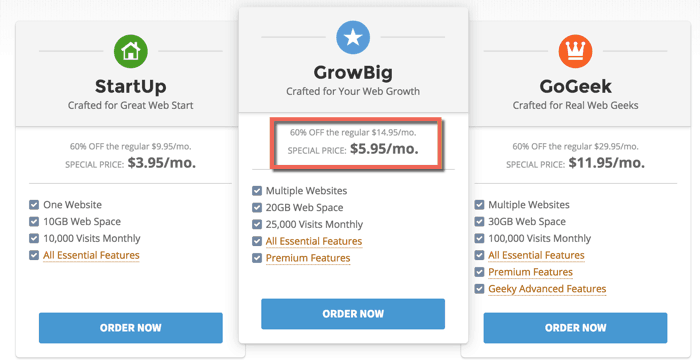
You can head over to SiteGround.com and see all the packages there.
I would recommend you pick either the “GrowBig” or “GoGeek” hosting plan, as both of them offer superior features and services. I have picked the “GrowBig” plan that costs only $7.95/month and is a really good value for the money.
If you need a staging feature (not essential for usual bloggers like you & me), you can opt for the “GoGeek” plan (which costs $14.95/month).

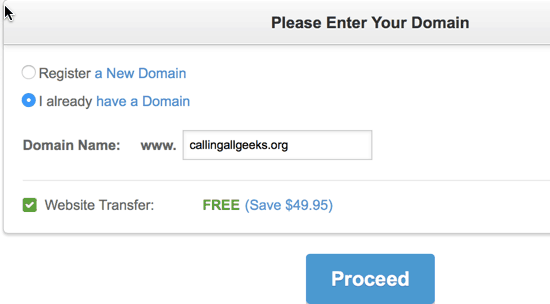
Click on “Get Started” at the bottom of the plan you want to buy. The next stage is where you need to enter your domain name. You can get a free domain name from SiteGround, or you can use your existing domain name to signup.
For this guide, I’m using an existing domain name:

Click on “Proceed” and you will be on the final page to complete the purchase of your hosting account.
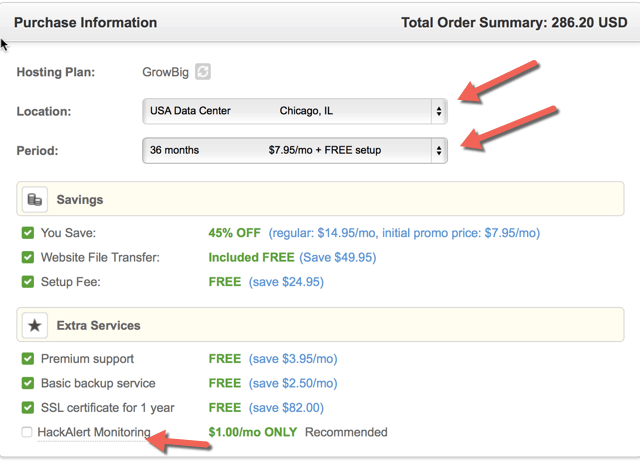
This is the most important page as you need to make a few changes to get the right hosting tenure, server location, and a few other things in order.
Follow the below screenshot:

You might want to uncheck “HackAlert Monitoring” because it’s an additional $1/month and not necessary. You also need to select the data center location based on the kind of website you are building.
- For example: If your target audience is in the U.S, select their U.S. data center. If your target audience is in an Asian country, you should choose an Asian data center.
Period of Hosting
When you are making your first purchase from SiteGround, you are getting a huge discount of 45%. This discount is only on the first web hosting invoice and from the next invoice onward, you will be paying the regular amount.
My recommendation is to buy hosting for a 2-3 year term to make the most out of it. I bought SiteGround’s 3-year hosting plan to save money in the long-term.
Once done, complete the process, and your credit card will be billed. Within minutes, you will receive an email from SiteGround with your login details.
After that, you can log in to your SiteGround account and make a request for free website migration.
They offer free website migration which is handy for webmasters like you and me who need to move an existing site to a newly purchased SiteGround hosting account.
- Get hosting from SiteGround (Save 45% on hosting)
These are the steps that I took to buy hosting from SiteGround.
I hope it will be helpful for you as a first-time buyer to help you purchase the right plan. If you have any questions, feel free to let me know via the comments.
Subscribe


2 thoughts on “How To Buy Hosting Package From SiteGround & Save Money”
I have 50000 page views per month. Can I use growbig account?
@Aruna
I would recommend using Gogeek plan in your case.