There are many things which you can do to make your site (and yourself) look professional.
When you are working online, your email address works as your first point of content. Having a professional email address will help you look more credible.
Usually, users use an email address like [email protected], [email protected], and so on. These free email services are always misused and spammed by spammers, so it’s better to get a professional email address with your domain.
You need something like:
Now, most people think using such email services cost a fortune, but it’s not true. Most web hosting services offer email services for free, but it’s always a good idea to use Google Apps Standard Edition to get free custom email addresses.
Google Apps Standard Edition let you create 10 free email addresses for any domain which you own. But the thing is, setting it up can be a little tough. So let me share with you the complete guide for Bluehost users to configure Google Apps right from their Bluehost cPanel.
Configure Google Apps Standard Edition from Bluehost cPanel:
Bluehost offers the Google Apps wizard in cPanel, which makes the process of creating a professional email address via cPanel very easy; anyone without technical skills can do it.
This is a simple 3 step process. Let’s go through it and use this great free feature offered by Bluehost.
Read: Bluehost Discount for WordPress Hosting
- Login to your Bluehost cPanel
- Go to Domains
- Click on Google Apps Wizard

Now, here we need to do two things:
- Create a free Google Apps account for your domain
- Verify your domain in Google Apps
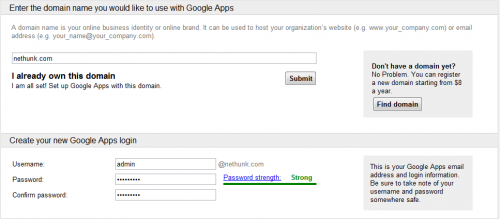
Go to this link to sign up for a free Google Apps Standard Account. Enter your domain name in the “I already own this domain name” field and click on “Submit”.
Now, start filling up the details like your username (admin), password, and contact details.

I recommend you to create an “admin” account first and later on, you can add 9 more free professional email addresses.
Google Apps Standard Edition limits you up to 10 free email accounts. If you need more, you can always sign up for a Pro account . Though, for a normal WordPress blog, 10 email accounts should be more than enough.
Now, fill out all other details and make sure you use a proper alternate email address. This will be very useful in recovering a password if you lose your Google Apps login details.
Once you have filled in all the details, click on “I accept and create my account”.
If you have done everything right, you will land on the Google Apps setup page. Click on “Express Setup” and start creating more user accounts (and some other setup processes which you can learn about here).
Now you need to verify your domain ownership from the Google Apps dashboard. You can do this from any of the suggested methods:
- Adding an HTML meta tag
- HTML file upload
- Google Analytics
- Recent domain ownership via your domain registrar
You can learn about domain verification from this video:
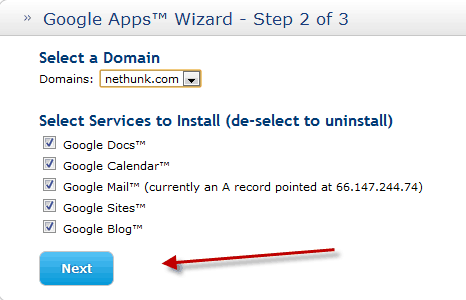
Once you have verified the domain, simply go back to the Bluehost panel under the Google Apps manager and click on “Next”. Here you can select the domain where you are trying to configure Google Apps, and you can enable specific Google services from.

On the next page, Bluehost will show you what CNAME changes they are making to configure Google Apps via Bluehost. You need to accept them and click on “Submit” at the bottom to complete the whole process.
That’s it! Now your professional email address is set up and ready to go.
You can always access your Google Apps dashboard by going to the following link:
- http://google.com/a/domain.com
You can access your professional email address by going to this link:
- http://mail.google.com/a/domain.com
NOTE: Replace “domain.com” with your domain name.
You can add more users from the Google Apps dashboard under the “Organization and Users” settings.
I always find using Google Apps for email hosting as a much better option than using the email services provided by hosting companies. If you switch hosting, you don’t have to worry much because all you need to do is add the CNAME settings into your new hosting account.
With the Google Apps wizard offered by Bluehost, setting up Google Apps is easy and pain-free.
- Related Read: How To Configure Free CDN CloudFlare On Bluehost
I hope you enjoyed this tutorial, and if you have any questions in setting up a domain email address, do let me know via the comments.
For more tutorials, don’t forget to subscribe to our Email newsletter!
Subscribe
