Namecheap and GoDaddy are two popular domain registration services, and Bluehost is one of the best hosting companies.
When you sign up for a Bluehost account, you get 1 free domain. But for additional domains, people often use other services like Namecheap and GoDaddy.
But when you buy a domain from a domain registrar, you will need to change the nameservers to point to your web hosting company (in this case Bluehost).
Every hosting account comes with specific nameservers, and you need to make sure to update the nameservers in your domain registrar to point to your web host. But don’t worry if this sounds hard, it’s very easy to do.
Here’s a tutorial which will show you how to point your Namecheap domain to your Bluehost hosting account.
Note: This process is the same for all domain registrars and web hosting companies. The specific locations of everything are different, but the process is the same.
How To Connect Namecheap Domain to Bluehost:
Namecheap is one of the most reliable domain registration companies out there. Part of their appeal is that they are always offering various promotional discounts for cheap domains.
Bluehost is a very popular hosting company also because of the cheap, yet quality products they offer. You can get WordPress hosting for only $3.95/month.
So here we need to take the Namecheap domain and point it to Bluehost’s nameservers.
Bluehost’s nameservers are:
- ns1.bluehost.com
- ns2.bluehost.com
You simply have to log into your Namecheap account and update the nameservers.
After this step is done, you can read about installing WordPress on Bluehost.
To change the Namecheap nameservers:
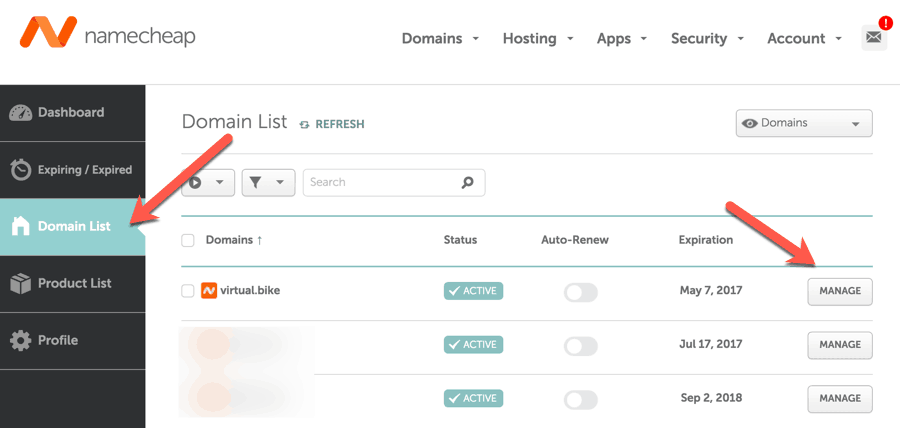
- Log into your Namecheap account and click on “Domain List” on the left sidebar.

This will list all of the domains under your Namecheap account.
- Click on “Manage” in front of the domain name which you want to point to Bluehost.
This will take you to your domain management page.
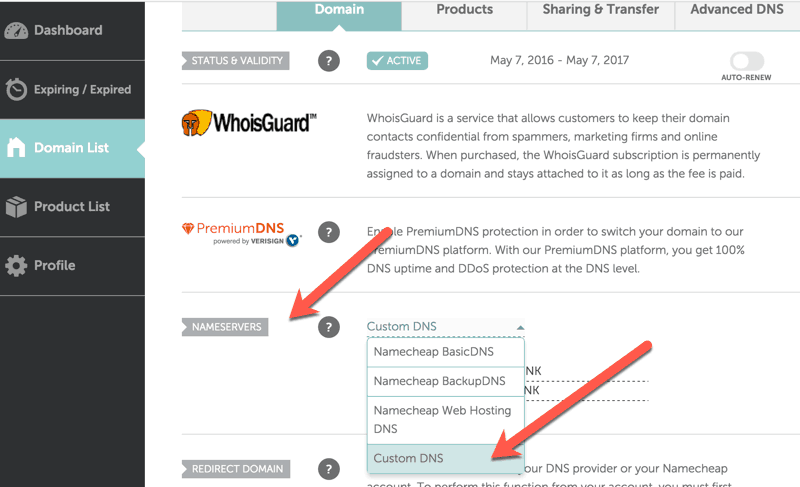
- Scroll down until you see the section that says “NAMESERVERS” & select the “Custom DNS” option from the dropdown menu.

This will bring up the nameservers tab where you can add your custom nameservers.
So, here we will add:
- ns1.bluehost.com
- ns2.bluehost.com
This will point our domain to the Bluehost servers.
Similarly, if you are using any other web hosting company, all you need to do is find the nameservers of the web host and add them into the “Custom DNS” section of Namecheap.
- When done, click on the green checkmark to save your new nameserver changes.

It takes some time for these changes to take effect, so don’t worry if your site still opens the Namecheap default page.
Sometimes, the delay takes a long time because of the ISP’s DNS replication time (1-4hrs), so if you’re unsure about the changes taking effect, you can check with Open DNS or Google DNS.
- Read: How To Change Nameserver Of Domain Bought from Google
- Read: Point Domain from Namecheap to HostGator
I hope this tutorial will help you get started with your domain on Namecheap and web hosting on Bluehost. If you have any other queries or need more tutorials, do let me know over on our Facebook page.
If you find this web hosting tutorial useful, don’t forget to share it on Facebook, Twitter, and Google Plus!
Subscribe


2 thoughts on “How To Point Nameservers from Namecheap to Bluehost”
The bottom image seems to show the same name server in both slots. This seems to conflict with what you said earilier in the article. Both are set to Ns1.bluehost.com, is this correct?
@Jared
That’s a mistake..You need to use
ns1.bluehost.com
ns2.bluehost.com